
写这篇的时候是因为我的一个项目此前一直是直接解析csv的数据写成renderdoc的json的, 但是未来要加入更多的材质参数和解析gltf的node节点. 要换成pygltf库, 但是之前手写的又不想放弃, 遂放进一个blog中作为知识点记录了(
简单介绍
什么是glTF?
glTF(GL Transmission Format)是 Khronos 集团开发的一种 3D 场景和模型传输格式(没错就是那个OpenGL和Vulkan的)。它也称为“JPEG in 3D”,专为高效的 3D 内容交付而设计。
1.0 版本于 2015 年发布,glTF 2.0 现已被广泛采用为标准。
与fbx和obj工作流相比, 具有紧凑的文件大小; 针对网络传输进行了优化; 发送到 GPU 的处理最少. 同时汲取了fbx工作流的优势, 同样可以进行外部引用/内嵌. 使用灵活的机制来添加新功能.
gltf主要有两种格式:
| 格式 | 扩展名 | 特点 | 适用场景 |
|---|---|---|---|
| glTF | .gltf | JSON 文本 + 外部二进制/图片文件 | 调试、手动编辑 |
| glB | .glb | 单一二进制文件,包含所有数据 | 网络传输, 生产交付环境 |
在这里只用一个最简单的组装模型来说, 贴图啥的就先不搞了(
数据结构
glTF(GL Transmission Format)本质上就两样东西:一个 JSON 文件描述场景的结构和引用关系,加上一块或多块二进制数据(又称为Buffer)存储实际的顶点、索引等数值。
所有的设计都围绕一个核心思想:JSON 描述”是什么”,二进制存储”具体数据”.
所有的gltf的数据结构可以简单看成这样的数据流:
Buffer → BufferView → Accessor → Mesh Primitive第一层:Buffer
Buffer 是最底层的原始二进制数据块,它本身没有任何语义,就是一堆字节, 存放了所有的数据. 它可以是一个外部 .bin 文件(glTF),也可以是完全内嵌的 base64 字符串(glB).
{ "buffers": [ { "uri": "data.bin", "byteLength": 21120 } ]}可以把它想象成一张白纸,上面写满了数字,但没人会告诉你哪些数字是位置、哪些是法线。
第二层:BufferView
BufferView 会在 Buffer 的基础上上划出一个区域,说”从第 X 字节开始,取 Y 个字节”。它还可以指定 byteStride(交错布局时每个顶点之间的间距)和 target(表示这块数据是顶点属性还是索引)。
{ "bufferViews": [ { "buffer": 0, "byteOffset": 0, "byteLength": 7920, "byteStride": 24, "target": 34962 }, { "buffer": 0, "byteOffset": 7920, "byteLength": 1320, "target": 34963 } ]}这里 target: 34962 是 ARRAY_BUFFER(顶点数据),34963 是 ELEMENT_ARRAY_BUFFER(索引数据)。这些常量直接来自 OpenGL/WebGL 的枚举值。
第三层:Accessor
Accessor 是最重要的一层。它在 BufferView 的基础上赋予了类型语义——告诉你这些字节应该被解读为什么类型的数据。
{ "accessors": [ { "bufferView": 0, "byteOffset": 0, "componentType": 5126, "count": 330, "type": "VEC3", "max": [13.53504, 10.8303, 12.28831], "min": [-13.84957, 0.03842, -11.62553] }, { "bufferView": 0, "byteOffset": 12, "componentType": 5126, "count": 330, "type": "VEC3" }, { "bufferView": 1, "byteOffset": 0, "componentType": 5123, "count": 330, "type": "SCALAR" } ]}componentType 表示每个分量的数据类型,后面跟的数字是数据类型. 5126 是 FLOAT(4字节),5123 是 UNSIGNED_SHORT(2字节),5121 是 UNSIGNED_BYTE。这些也是 OpenGL 的常量。
type 表示每个元素的结构,"SCALAR" 就是一个数,"VEC2" 是两个分量,"VEC3" 三个,"VEC4" 四个,还有 "MAT4" 等矩阵类型。
count 是元素的个数,比如 330 个顶点。
max 和 min 是每个分量的最大最小值,POSITION 的 accessor 必须提供,其他属性可选。这让加载器不读取实际数据就能计算包围盒。
第四层:Mesh Primitive
现在把 accessor 组装成一个可渲染的几何体:
{ "meshes": [ { "name": "MyMesh", "primitives": [ { "attributes": { "POSITION": 0, "NORMAL": 1, "TANGENT": 2, "TEXCOORD_0": 3, "TEXCOORD_1": 4 }, "indices": 5, "material": 0, "mode": 4 } ] } ]}attributes 里的数值是 accessor 的索引号。mode: 4 表示三角形列表(TRIANGLES),这也是默认值。
最后我们就可以组装为一个最基础的物体了!
最后进行合并
在这里我们默认是一个node(有关于更多的数据可以看下面的扩展, 这里用一个最基本的组装来展示, 没有贴图, 材质指定等其他数据流, 只有基本的顶点组装)
{
"asset": { "version": "2.0" }, // glTF 规范版本 "scene": 0, // 默认场景索引 "scenes": [{ "nodes": [0] }], // 场景数组,nodes 指向根节点索引 "nodes": [{ "mesh": 0 }], // 节点数组,mesh 引用网格索引
"meshes": [{ "primitives": [{ "attributes": { "POSITION": 0 }, // 顶点位置 → accessors[0] "indices": 1, // 索引缓冲区 → accessors[1] "mode": 4 // 绘制模式:4=TRIANGLES }] }],
"accessors": [ { "bufferView": 0, // → bufferViews[0](顶点数据) "componentType": 5126, // 5126=FLOAT. "count": 4, // 4个顶点 "type": "VEC3", // 每顶点3个分量(x,y,z) "min": [0.0, 0.0, 0.0], // 坐标最小值 "max": [1.0, 1.0, 0.0] // 坐标最大值 }, { "bufferView": 1, // → bufferViews[1](索引数据) "componentType": 5123, // 5123=UNSIGNED_SHORT "count": 6, // 6个索引(2个三角形) "type": "SCALAR" // 标量 } ],
"bufferViews": [ { "buffer": 0, // → buffers[0] "byteOffset": 0, // 从第0字节开始 "byteLength": 48, // 4顶点×3分量×4字节=48字节 "target": 34962 // 34962=ARRAY_BUFFER(顶点属性) }, { "buffer": 0, // → buffers[0] "byteOffset": 48, // 从第48字节开始(紧接顶点数据后) "byteLength": 12, // 6索引×2字节=12字节 "target": 34963 // 34963=ELEMENT_ARRAY_BUFFER(索引) } ],
"buffers": [{ "byteLength": 60, // 总长度:48+12=60字节 "uri": "data:application/octet-stream;base64,..." // base64编码的二进制数据 }]
}扩展: Node 和 Scene, 材质系统
场景图:Node 和 Scene
几何体要放到场景里才有意义,glTF 用 Node 树来组织.
{ "nodes": [ { "name": "RootNode", "mesh": 0, "translation": [0, 0, 0], "rotation": [0, 0, 0, 1], "scale": [1, 1, 1], "children": [1, 2] } ], "scenes": [ { "name": "Scene", "nodes": [0] } ], "scene": 0}Node 可以有 translation、rotation(四元数)、scale,也可以直接给一个 matrix(4x4列主序矩阵),但两者不能同时存在。Node 通过 children 形成树状层级,变换逐级累乘, 要特别注意母级的变换影响.
材质系统
glTF 使用 PBR 金属-粗糙度工作流.
{ "materials": [ { "name": "MyMaterial", "pbrMetallicRoughness": { "baseColorTexture": { "index": 0, "texCoord": 0 }, "metallicFactor": 0.0, "roughnessFactor": 0.8 }, "normalTexture": { "index": 1, "texCoord": 0, "scale": 1.0 }, "emissiveFactor": [0, 0, 0] } ]}texCoord 字段可以指定用 TEXCOORD_0 还是 TEXCOORD_1。模型同样可以写入多套uv. 如果你的 lightmap 贴图要用第二套UV,就可以写 "texCoord": 1。
这里还有一个比较有意思的点, glTF 规范要求实现至少支持两套UV(TEXCOORD_0 和 TEXCOORD_1),但 mesh 本身可以包含更多套。[1]
一般来说, 第一套UV就是给正常贴图用的, 第二套UV则是专门给LightMap做的.
不过实际兼容性要注意几点:
早期的 Three.js 引擎不允许为纹理使用任意UV坐标集,而是将 channel 0 硬编码给所有贴图,channel 1 给 lightMap。[7]虽然后来有改善,但这说明不是所有查看器和引擎都能完美处理 3 套以上的UV。
在一些实现中,支持超过两套UV被认为是低优先级功能,因为需求极少,且会增加shader的复杂度或变体数量。[1]
贴图的引用链也是分层的:Material → Texture → Image + Sampler.
{ "textures": [{ "source": 0, "sampler": 0 }], "images": [{ "uri": "albedo.png" }], "samplers": [{ "magFilter": 9729, "minFilter": 9987, "wrapS": 10497, "wrapT": 10497 }]}Sampler 里的数字同样是 OpenGL 常量. 9729 是 LINEAR,9987 是 LINEAR_MIPMAP_LINEAR,10497 是 REPEAT。
├── asset (资产信息)├── scenes[] (场景数组)├── nodes[] (节点数组)├── meshes[] (网格数组)│ └── primitives[] (基元数组)│ └── attributes (顶点属性: POSITION, NORMAL, TEXCOORD_0, etc.)├── materials[] (材质数组)├── textures[] (纹理数组)├── images[] (图像数组)├── samplers[] (采样器数组)├── animations[] (动画数组)├── cameras[] (相机数组)├── skins[] (皮肤/骨骼数组)├── buffers[] (缓冲区数组)├── bufferViews[] (缓冲区视图数组)├── accessors[] (访问器数组)├── extensionsUsed[] (使用的扩展)├── extensionsRequired[] (必需的扩展)└── extras (自定义扩展数据)加入所有扩展以后(当然还有很多功能, 可以见上), 一个基本的就有:
scene └─ node (transform) └─ mesh └─ primitive ├─ attributes → accessors → bufferViews → buffer ├─ indices → accessor → bufferView → buffer └─ material └─ textures → images + samplers扩展完整示例
这个是ai给我的一个示例, 当然我还没有尝试过, 但是看了一眼大概是正确的
同一个正方形,加上场景层级、材质、贴图后的完整结构。用 // 注释 来标注每个部分的作用(实际 JSON 不支持注释,这里只是方便阅读):
{ // ═══════════════════════════════════════════════ // 元信息 // ═══════════════════════════════════════════════ "asset": { "version": "2.0", "generator": "my-csv-to-gltf" },
// ═══════════════════════════════════════════════ // 场景层级:scene → node → mesh // ═══════════════════════════════════════════════ "scene": 0, // 默认激活第0个场景
"scenes": [ { "name": "MainScene", "nodes": [0] // 场景里放了1个节点 } ],
"nodes": [ { "name": "SquarePlane", "mesh": 0, // 这个节点引用第0个mesh "translation": [0, 0, 0], // 可选:位移 "rotation": [0, 0, 0, 1], // 可选:四元数旋转 "scale": [1, 1, 1] // 可选:缩放 } ],
// ═══════════════════════════════════════════════ // 网格:把顶点属性 + 索引 + 材质绑在一起 // ═══════════════════════════════════════════════ "meshes": [ { "name": "SquareMesh", "primitives": [ { "attributes": { "POSITION": 0, // → accessors[0] "NORMAL": 1, // → accessors[1] "TEXCOORD_0": 2 // → accessors[2] }, "indices": 3, // → accessors[3] "material": 0, // → materials[0] "mode": 4 // 4 = TRIANGLES } ] } ],
// ═══════════════════════════════════════════════ // 材质:PBR 金属度-粗糙度工作流 // ═══════════════════════════════════════════════ "materials": [ { "name": "WallMaterial", "pbrMetallicRoughness": { "baseColorTexture": { "index": 0, // → textures[0] "texCoord": 0 // 使用 TEXCOORD_0 }, "baseColorFactor": [1, 1, 1, 1], "metallicFactor": 0.0, "roughnessFactor": 0.8 }, "normalTexture": { // 可选:法线贴图 "index": 1, // → textures[1] "texCoord": 0, "scale": 1.0 }, "doubleSided": false } ],
// ═══════════════════════════════════════════════ // 贴图链:texture → sampler + image // ═══════════════════════════════════════════════ "textures": [ { "name": "BaseColorTex", "sampler": 0, // → samplers[0] "source": 0 // → images[0] }, { "name": "NormalTex", "sampler": 0, // 可以复用同一个sampler"source": 1 // → images[1]}],
"samplers": [ { "magFilter": 9729, // LINEAR "minFilter": 9987, // LINEAR_MIPMAP_LINEAR "wrapS": 10497, // REPEAT "wrapT": 10497 // REPEAT }],
"images": [ { "name": "wall_diffuse", "mimeType": "image/png", "bufferView": 4 // → bufferViews[4](图片二进制嵌在buffer里)},{ "name": "wall_normal", "mimeType": "image/png", "bufferView": 5 // → bufferViews[5] } ],
// ═══════════════════════════════════════════════ // 数据描述层:accessor → bufferView → buffer // ═══════════════════════════════════════════════ "accessors": [ // [0] 顶点位置 { "bufferView": 0, "byteOffset": 0, "componentType": 5126, // FLOAT "count": 4, // 4个顶点(去重后) "type": "VEC3", "min": [0.0, 0.0, 0.0], // 包围盒最小角(必填) "max": [1.0, 1.0, 0.0] // 包围盒最大角(必填) }, // [1] 顶点法线 { "bufferView": 1, "byteOffset": 0, "componentType": 5126, // FLOAT "count": 4, "type": "VEC3" }, // [2] UV坐标 { "bufferView": 2, "byteOffset": 0, "componentType": 5126, // FLOAT "count": 4, "type": "VEC2" }, // [3] 三角形索引 { "bufferView": 3, "byteOffset": 0, "componentType": 5123, // UNSIGNED_SHORT "count": 6, // 2个三角形 × 3 = 6个索引 "type": "SCALAR" } ],
"bufferViews": [ // [0] 位置数据 { "buffer": 0, "byteOffset": 0, "byteLength": 48, // 4顶点 × 3分量 × 4字节 = 48 "target": 34962 // ARRAY_BUFFER(顶点属性) }, // [1] 法线数据 { "buffer": 0, "byteOffset": 48, "byteLength": 48, // 4顶点 × 3分量 × 4字节 = 48 "target": 34962 }, // [2] UV数据 { "buffer": 0, "byteOffset": 96, "byteLength": 32, // 4顶点 × 2分量 × 4字节 = 32 "target": 34962 }, // [3] 索引数据 { "buffer": 0, "byteOffset": 128, "byteLength": 12, // 6索引 × 2字节 = 12 "target": 34963 // ELEMENT_ARRAY_BUFFER(索引) }, // [4] 漫反射贴图的PNG二进制 { "buffer": 0, "byteOffset": 140, "byteLength": 8192 // 图片大小(举例) }, // [5] 法线贴图的PNG二进制 { "buffer": 0, "byteOffset": 8332, "byteLength": 6144 // 图片大小(举例) } ],
// ═══════════════════════════════════════════════ // 最底层:一个大的二进制块,所有数据都塞在里面 // ═══════════════════════════════════════════════ "buffers": [ { "byteLength": 14476, "uri": "data:application/octet-stream;base64,AAAA..." } ]}整体引用关系
从上到下是这样一棵树:
scene └─ node(位移/旋转/缩放) └─ mesh └─ primitive ├─ attributes │ ├─ POSITION → accessor[0] → bufferView[0] ─┐ │ ├─ NORMAL → accessor[1] → bufferView[1] ├→ buffer[0] │ └─ TEXCOORD_0 → accessor[2] → bufferView[2] ─┤ (一个大的 ├─ indices → accessor[3] → bufferView[3] ─┤ 二进制块) └─ material │ ├─ baseColorTexture → texture[0] │ │ ├─ sampler[0] │ │ └─ image[0] → bufferView[4] ─┤ └─ normalTexture → texture[1] │ ├─ sampler[0] │ └─ image[1] → bufferView[5] ─┘所有数据最终都汇聚到同一个 buffer[0],它就是一整块连续的二进制内存。bufferView 通过 byteOffset 和 byteLength 在这块内存里”切窗口”,accessor 再告诉 GPU 怎么解读窗口里的字节(是 float 还是 unsigned short,是 VEC3 还是 SCALAR,有几个元素)。
贴图也一样——PNG 文件的原始字节直接嵌在同一个 buffer 里,image 通过 bufferView 指向它,加载器读到后解码成纹理上传给 GPU。
示例
这里展示了一个石头, 用RenderDoc导出的csv, 手写写成一个gltf文件. 也可以尝试运行这个脚本转换一下. 日志callback要自己改成print到终端. 因为callback原来是给我的客户端输出日志用的, 不需要终端. 如果是命令行的话那要改一下.
import csvimport argparseimport osimport jsonimport structimport base64
def find_column_indices(header, log_callback=None): """根据表头猜测POSITION, NORMAL, TEXCOORD, COLOR, TANGENT的起始列索引""" indices = {'pos': -1, 'norm': -1, 'uv': -1, 'color': -1, 'tangent': -1} # 将header转为大写以进行不区分大小写的匹配 upper_header = [h.upper() for h in header]
try: # 查找包含 'POS' 或 'POSITION' 的第一个元素 indices['pos'] = next(i for i, h in enumerate(upper_header) if 'POS' in h) if log_callback: log_callback(f" [OK] 检测到位置(Position)数据起始于列: {indices['pos']}") except StopIteration: if log_callback: log_callback(" [警告] 在CSV表头中未找到位置(Position)数据。")
try: # 查找包含 'NORM' 或 'NORMAL' 的第一个元素 indices['norm'] = next(i for i, h in enumerate(upper_header) if 'NORM' in h) if log_callback: log_callback(f" [OK] 检测到法线(Normal)数据起始于列: {indices['norm']}") except StopIteration: if log_callback: log_callback(" [警告] 在CSV表头中未找到法线(Normal)数据。")
try: # 查找包含 'TEX' 或 'TEXCOORD' 的第一个元素 indices['uv'] = next(i for i, h in enumerate(upper_header) if 'TEX' in h) if log_callback: log_callback(f" [OK] 检测到UV(TexCoord)数据起始于列: {indices['uv']}") except StopIteration: if log_callback: log_callback(" [警告] 在CSV表头中未找到UV(TexCoord)数据。")
try: # 查找包含 'COLOR' 或 'COLOUR' 的第一个元素 indices['color'] = next(i for i, h in enumerate(upper_header) if 'COLOR' in h or 'COLOUR' in h) if log_callback: log_callback(f" [OK] 检测到顶点色(Color)数据起始于列: {indices['color']}") except StopIteration: if log_callback: log_callback(" [警告] 在CSV表头中未找到顶点色(Color)数据。")
try: # 查找包含 'TANGENT' 的第一个元素 indices['tangent'] = next(i for i, h in enumerate(upper_header) if 'TANGENT' in h) if log_callback: log_callback(f" [OK] 检测到切线(Tangent)数据起始于列: {indices['tangent']}") except StopIteration: if log_callback: log_callback(" [警告] 在CSV表头中未找到切线(Tangent)数据。")
return indices
def convert_csv_to_gltf(input_filepath, output_filepath, log_callback=None): """ 将RenderDoc导出的CSV文件转换为GLTF模型文件。 拓扑结构为三角面列表 (Triangle List)。 """ if log_callback: log_callback(f"正在处理: {input_filepath} -> {output_filepath}") try: with open(input_filepath, 'r', encoding='utf-8') as infile: reader = csv.reader(infile)
header = next(reader) col_indices = find_column_indices(header, log_callback)
if col_indices['pos'] == -1: if log_callback: log_callback(" [错误] CSV文件中必须包含顶点位置数据。跳过此文件。") return False
vertices = list(reader) num_vertices = len(vertices)
if num_vertices == 0: if log_callback: log_callback(" [错误] CSV文件中没有数据行。跳过此文件。") return False
# 准备数据缓冲区 positions = [] normals = [] texcoords = [] colors = [] tangents = [] indices = []
# 读取顶点数据 for idx, row in enumerate(vertices): # 位置数据 x, y, z = map(float, row[col_indices['pos']:col_indices['pos'] + 3]) positions.extend([x, y, z])
# 法线数据 if col_indices['norm'] != -1: nx, ny, nz = map(float, row[col_indices['norm']:col_indices['norm'] + 3]) normals.extend([nx, ny, nz])
# UV数据 if col_indices['uv'] != -1: u, v = map(float, row[col_indices['uv']:col_indices['uv'] + 2]) texcoords.extend([u, 1.0 - v]) # 翻转V坐标
# 顶点色数据 if col_indices['color'] != -1: # 尝试读取4个分量(RGBA),如果只有3个则添加alpha=1.0 try: r = float(row[col_indices['color']]) g = float(row[col_indices['color'] + 1]) b = float(row[col_indices['color'] + 2]) # 尝试读取alpha通道 try: a = float(row[col_indices['color'] + 3]) except (IndexError, ValueError): a = 1.0 colors.extend([r, g, b, a]) except (IndexError, ValueError) as e: if log_callback: log_callback(f" [警告] 第{idx}行顶点色数据读取失败: {e}") colors.extend([1.0, 1.0, 1.0, 1.0]) # 默认白色
# 切线数据 if col_indices['tangent'] != -1: try: tx = float(row[col_indices['tangent']]) ty = float(row[col_indices['tangent'] + 1]) tz = float(row[col_indices['tangent'] + 2]) tw = float(row[col_indices['tangent'] + 3]) tangents.extend([tx, ty, tz, tw]) except (IndexError, ValueError) as e: if log_callback: log_callback(f" [警告] 第{idx}行切线数据读取失败: {e}") tangents.extend([1.0, 0.0, 0.0, 1.0]) # 默认切线
# 索引数据(对于三角形列表,索引就是顺序) indices.append(idx)
# 计算边界框 min_pos = [min(positions[i::3]) for i in range(3)] max_pos = [max(positions[i::3]) for i in range(3)]
buffer_parts = [] # 用于存储各个部分的二进制数据 buffer_views = [] accessors = [] current_offset = 0
def add_buffer_data(data, component_type, accessor_type, target=None): """添加数据到buffer并创建对应的bufferView和accessor""" nonlocal current_offset
# 将数据转换为二进制 if component_type == 5126: # FLOAT binary_data = struct.pack(f'{len(data)}f', *data) elif component_type == 5125: # UNSIGNED_INT binary_data = struct.pack(f'{len(data)}I', *data) elif component_type == 5123: # UNSIGNED_SHORT binary_data = struct.pack(f'{len(data)}H', *data) else: raise ValueError(f"不支持的component_type: {component_type}")
byte_length = len(binary_data)
# 添加padding以满足4字节对齐要求 padding_needed = (4 - (byte_length % 4)) % 4 if padding_needed > 0: binary_data += b'\x00' * padding_needed
# 创建bufferView buffer_view = { "buffer": 0, "byteOffset": current_offset, "byteLength": byte_length } if target is not None: buffer_view["target"] = target
buffer_view_index = len(buffer_views) buffer_views.append(buffer_view)
# 计算accessor的count if accessor_type == "SCALAR": count = len(data) elif accessor_type == "VEC2": count = len(data) // 2 elif accessor_type == "VEC3": count = len(data) // 3 elif accessor_type == "VEC4": count = len(data) // 4 else: raise ValueError(f"不支持的accessor_type: {accessor_type}")
# 创建accessor accessor = { "bufferView": buffer_view_index, "componentType": component_type, "count": count, "type": accessor_type }
accessor_index = len(accessors) accessors.append(accessor)
# 更新偏移量 buffer_parts.append(binary_data) current_offset += len(binary_data)
return accessor_index
# 添加各种数据的accessor attributes = {}
# 位置 (必须有min/max) pos_accessor = add_buffer_data(positions, 5126, "VEC3", 34962) accessors[pos_accessor]["min"] = min_pos accessors[pos_accessor]["max"] = max_pos attributes["POSITION"] = pos_accessor
# 法线 if normals: norm_accessor = add_buffer_data(normals, 5126, "VEC3", 34962) attributes["NORMAL"] = norm_accessor
# UV if texcoords: uv_accessor = add_buffer_data(texcoords, 5126, "VEC2", 34962) attributes["TEXCOORD_0"] = uv_accessor
# 顶点色 if colors: color_accessor = add_buffer_data(colors, 5126, "VEC4", 34962) attributes["COLOR_0"] = color_accessor
# 切线 if tangents: tangent_accessor = add_buffer_data(tangents, 5126, "VEC4", 34962) attributes["TANGENT"] = tangent_accessor
# 索引 - 根据顶点数选择合适的类型 if num_vertices < 65536: # 使用UNSIGNED_SHORT节省空间 indices_accessor = add_buffer_data(indices, 5123, "SCALAR", 34963) else: # 使用UNSIGNED_INT indices_accessor = add_buffer_data(indices, 5125, "SCALAR", 34963)
# 合并所有二进制数据 combined_buffer = b''.join(buffer_parts)
# 从输入文件名生成 mesh 名称和材质名称 input_basename = os.path.basename(input_filepath) mesh_name = os.path.splitext(input_basename)[0] # 移除可能的 "fbx_" 前缀,使名称更简洁 if mesh_name.lower().startswith("fbx_"): mesh_name = mesh_name[4:] material_name = f"M_{mesh_name}"
# 创建GLTF结构 gltf = { "asset": { "version": "2.0", "generator": "csv_to_gltf.py v2" }, "scene": 0, "scenes": [ { "nodes": [0] } ], "nodes": [ { "name": mesh_name, "mesh": 0 } ], "meshes": [ { "name": mesh_name, "primitives": [ { "attributes": attributes, "indices": indices_accessor, "mode": 4, # TRIANGLES "material": 0 } ] } ], "materials": [ { "name": material_name, "pbrMetallicRoughness": { "baseColorFactor": [1.0, 1.0, 1.0, 1.0], "metallicFactor": 0.0, "roughnessFactor": 0.5 } } ], "accessors": accessors, "bufferViews": buffer_views, "buffers": [ { "byteLength": len(combined_buffer), "uri": f"data:application/octet-stream;base64,{base64.b64encode(combined_buffer).decode('ascii')}" } ] }
# 写入GLTF文件 with open(output_filepath, 'w', encoding='utf-8') as outfile: json.dump(gltf, outfile, indent=2)
if log_callback: log_callback(f" [成功] 转换完成!模型已保存到: {output_filepath}") log_callback(f" 顶点数: {num_vertices}, 三角形数: {num_vertices // 3}") log_callback(f" 包含属性: {', '.join(attributes.keys())}") return True
except FileNotFoundError: if log_callback: log_callback(f" [错误] 输入文件 '{input_filepath}' 未找到。") except Exception as e: if log_callback: log_callback(f" [错误] 转换过程中发生错误: {e}") import traceback traceback.print_exc() return False
# ==============================================================================# 脚本主入口点# ==============================================================================if __name__ == "__main__": parser = argparse.ArgumentParser( description="将RenderDoc导出的顶点CSV文件转换为GLTF模型。支持单文件或批量转换。", formatter_class=argparse.RawTextHelpFormatter )
parser.add_argument( "input", nargs='?', default=None, help="可选: 要转换的单个CSV文件路径。\n如果留空,脚本将自动转换当前目录下的所有.csv文件。" ) parser.add_argument( "-o", "--output", help="可选: 输出的GLTF文件路径 (仅在指定单个输入文件时有效)。" )
args = parser.parse_args() if args.input: # **单文件模式**: 用户提供了输入文件名 print("模式: 单文件转换") input_filepath = args.input
# 决定输出文件名 if args.output: output_filepath = args.output else: base_name = os.path.splitext(input_filepath)[0] output_filepath = f"{base_name}.gltf"
convert_csv_to_gltf(input_filepath, output_filepath)
else: # **批量模式**: 用户没有提供输入文件名 print("模式: 批量转换 (未指定输入文件,将搜索当前目录)")
csv_files = [f for f in os.listdir('.') if f.lower().endswith('.csv')]
if not csv_files: print("在当前目录中未找到任何 .csv 文件。") else: print(f"找到 {len(csv_files)} 个CSV文件,准备开始转换...\n") success_count = 0 fail_count = 0 for filename in csv_files: base_name = os.path.splitext(filename)[0] output_filename = f"{base_name}.gltf"
if convert_csv_to_gltf(filename, output_filename): success_count += 1 else: fail_count += 1 print("-" * 60)
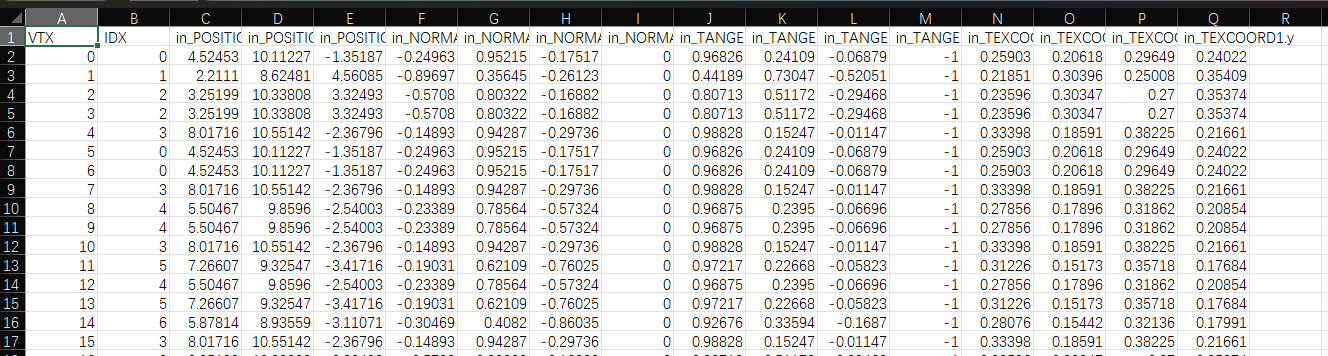
print("\n批量转换完成!") print(f"总计: {success_count} 个成功, {fail_count} 个失败。")第一阶段:解析 CSV,把原始数据分类装桶
for idx, row in enumerate(vertices): x, y, z = map(float, row[col_indices['pos']:col_indices['pos'] + 3]) positions.extend([x, y, z])
if col_indices['norm'] != -1: nx, ny, nz = map(float, row[col_indices['norm']:col_indices['norm'] + 3]) normals.extend([nx, ny, nz])
if col_indices['uv'] != -1: u, v = map(float, row[col_indices['uv']:col_indices['uv'] + 2]) texcoords.extend([u, 1.0 - v]) # 翻转V坐标
indices.append(idx)这一步还没涉及 glTF,纯粹是根据RenderDoc的解析把 CSV 的每一行拆开,把位置、法线、UV 等数据分别存进独立的 Python 列表。每个列表是一个扁平的浮点数组,比如 positions = [x0, y0, z0, x1, y1, z1, ...]。
注意 **1.0 - v** 这个翻转——因为 CSV 来自 RenderDoc(OpenGL 捕获),OpenGL 的纹理坐标原点在左下角,而 glTF 规范要求纹理原点在左上角,所以 V 坐标要翻转。
还有一个关键点:indices 在这里就是 [0, 1, 2, 3, 4, ...] 的顺序索引。因为 RenderDoc 导出的 CSV 已经是展开的三角形列表(每三行一个三角形),所以索引就是顺序排列。 CSV 里虽然有 IDX 列,但这个脚本没有用它——这意味着重复的顶点没有被去重复用,而是直接按原样写入. 这确实是我未来的一个改进方式
第二阶段:把浮点数组打包成二进制, 构建 Buffer
这是整个脚本的核心,add_buffer_data 函数做了三件事:
2.1 把 Python 列表变成字节
if component_type == 5126: # FLOAT binary_data = struct.pack(f'{len(data)}f', *data)elif component_type == 5125: # UNSIGNED_INT binary_data = struct.pack(f'{len(data)}I', *data)elif component_type == 5123: # UNSIGNED_SHORT binary_data = struct.pack(f'{len(data)}H', *data)struct.pack 把 Python 的浮点数/整数按照指定格式编码为原始字节。比如 positions = [4.52453, 10.11227, -1.35187, ...] 经过 struct.pack('330f', ...) 就变成了 1320 字节的二进制数据(每个 float 4 字节,330 个顶点 × 3 分量 = 990 个 float,共 3960 字节)。
这里的 5126、5125、5123 就是 glTF/OpenGL 的常量,分别对应 FLOAT、UNSIGNED_INT、UNSIGNED_SHORT。
2.2 处理字节对齐
padding_needed = (4 - (byte_length % 4)) % 4if padding_needed > 0: binary_data += b'\x00' * padding_neededglTF 规范要求 bufferView 的 byteOffset 必须是 4 的倍数。如果某段数据长度不是 4 的整数倍(比如索引用 UNSIGNED_SHORT,3 个索引 = 6 字节),就在末尾补零填充到 4 的倍数(8 字节)。这段代码保证了后续数据的起始位置一定是对齐的。
2.3 创建 BufferView 和 Accessor
buffer_view = { "buffer": 0, "byteOffset": current_offset, "byteLength": byte_length}
accessor = { "bufferView": buffer_view_index, "componentType": component_type, "count": count, "type": accessor_type}每调用一次 add_buffer_data,就在同一个 Buffer 里”划出一块区域”(BufferView),然后给这块区域一个”解读说明”(Accessor)。
current_offset 是一个不断递增的指针,记录当前写到了 Buffer 的第几个字节。每次写完一段数据(包括 padding),指针往后移。所以最终的 Buffer 内存布局是这样的:
[positions 数据 | padding | normals 数据 | padding | uvs 数据 | padding | tangents 数据 | padding | indices 数据 | padding] ^ ^ ^ ^ ^ bufferView 0 bufferView 1 bufferView 2 bufferView 3 bufferView 4这就是我之前说的分离布局——每种属性各占一个 BufferView,简单明了
第三阶段:组装 Mesh Primitive
attributes = {}
pos_accessor = add_buffer_data(positions, 5126, "VEC3", 34962)accessors[pos_accessor]["min"] = min_posaccessors[pos_accessor]["max"] = max_posattributes["POSITION"] = pos_accessor
if normals: norm_accessor = add_buffer_data(normals, 5126, "VEC3", 34962) attributes["NORMAL"] = norm_accessor
if texcoords: uv_accessor = add_buffer_data(texcoords, 5126, "VEC2", 34962) attributes["TEXCOORD_0"] = uv_accessor这里 34962 是 ARRAY_BUFFER(顶点属性),34963 是 ELEMENT_ARRAY_BUFFER(索引)。
最终 attributes 字典会变成类似 {"POSITION": 0, "NORMAL": 1, "TEXCOORD_0": 2, "TANGENT": 3},每个值就是对应 accessor 的索引号。
注意 POSITION 的 accessor 额外添加了 min 和 max——glTF 规范强制要求 POSITION 必须有这两个字段,用于加载器快速计算包围盒,不需要遍历所有顶点。
第四阶段:编码 Buffer 并组装最终 JSON
combined_buffer = b''.join(buffer_parts)
"buffers": [ { "byteLength": len(combined_buffer), "uri": f"data:application/octet-stream;base64,{base64.b64encode(combined_buffer).decode('ascii')}" }]这里把所有二进制数据合并成一整块,然后用 base64 编码直接内嵌到 JSON 里。这是 glTF 支持的一种方式——所有数据都在一个 .gltf 文件里,不需要额外的 .bin 文件。好处是分发方便(只有一个文件),代价是 base64 编码会让数据体积膨胀约 33%。
另一种做法是把二进制数据写成独立的 .bin 文件,然后 "uri": "model.bin"。还有第三种就是 .glb 格式,把 JSON 和二进制数据打包在一个二进制容器里。
第五阶段:场景结构和材质
"scenes": [{"nodes": [0]}],"nodes": [{"name": mesh_name, "mesh": 0}],"meshes": [{ "name": mesh_name, "primitives": [{ "attributes": attributes, "indices": indices_accessor, "mode": 4, "material": 0 }]}],"materials": [{ "name": material_name, "pbrMetallicRoughness": { "baseColorFactor": [1.0, 1.0, 1.0, 1.0], "metallicFactor": 0.0, "roughnessFactor": 0.5 }}]这是最上层的组装。一个 Scene 包含一个 Node,Node 引用一个 Mesh,Mesh 有一个 Primitive,Primitive 把 attributes 和 indices 连接起来,并指向一个默认材质。mode: 4 是三角形列表。
材质这里很简单,白色基础色、非金属(metallicFactor: 0)、中等粗糙度。因为 CSV 里没有贴图信息,所以没有 textures、images、samplers 部分。
这个脚本的改进方向
第一,只写入了 TEXCOORD_0,丢掉了 TEXCOORD_1。find_column_indices 只找了第一个匹配 'TEX' 的列,你的第二套UV(in_TEXCOORD1.x, in_TEXCOORD1.y)被忽略了。要支持多套UV,需要在检测时找到所有匹配的列,然后分别写入 TEXCOORD_0 和 TEXCOORD_1。
第二,索引没有去重。 RenderDoc解析出的 CSV 里有大量重复顶点(比如 IDX=0 出现了三次),但脚本把它们当作独立顶点写入,索引就是 [0, 1, 2, 3, ...] 的顺序。如果用 IDX 列来构建真正的索引缓冲区,可以显著减小文件体积。
第三,法线的 w 分量被丢弃了。 CSV 里法线有 4 个分量(in_NORMAL0.x/y/z/w),但 glTF 的 NORMAL 只支持 VEC3,所以 w 分量被忽略了。这通常没问题,因为法线的 w 一般就是 0.
最后, 我的评价是: 还是专区pygltf吧(毕竟手写要加减和node啥的人家有轮子了我为什么还要传统手写呢, 不过确实手写能了解到很多有关于gltf的底层数据结构了
最后补充一个纹理嵌入引用(半废弃的)
"""纹理匹配器和GLTF材质处理器用于为RenderDoc导出的GLTF模型添加纹理材质"""
import osimport jsonimport base64import structfrom typing import Dict, List, Optional, Tupleimport mimetypes
class TextureMatcher: """纹理匹配器 - 基于关键字匹配纹理类型"""
def __init__(self, texture_keywords: Dict[str, List[str]], texture_formats: List[str] = None): """ 初始化纹理匹配器
Args: texture_keywords: 纹理关键字映射,如 {'diffuse': ['diff', 'albedo'], 'normal': ['norm', 'nrm']} texture_formats: 纹理格式优先级,默认 ['exr', 'png'] """ self.texture_keywords = texture_keywords self.texture_formats = texture_formats or ['png', 'exr']
def analyze_texture_type(self, filename: str) -> str: """ 基于文件名分析纹理类型,智能过滤内部缓冲区名称
Args: filename: 纹理文件名
Returns: 纹理类型 ('diffuse', 'normal', 'unknown') """ filename_lower = filename.lower()
# 排除渲染内部缓冲区名称(这些不是真正的纹理) # 模式:包含技术规格参数,如分辨率、格式等 internal_patterns = [ r'\d+x\d+', # 分辨率,如 1920x1200 r'_[rb]\d+g\d+b\d+', # 格式,如 r8g8b8a8 r'_tex\d*d', # tex2d, tex3d r'_sf\d+', # 采样格式 r'_bf\d+', # 缓冲区格式 ]
import re # 如果文件名匹配内部缓冲区模式,降低优先级 is_internal = any(re.search(pattern, filename_lower) for pattern in internal_patterns)
# 计算匹配分数 best_match = 'unknown' best_score = 0
for tex_type, keywords in self.texture_keywords.items(): for keyword in keywords: if keyword in filename_lower: # 基础分数 score = 1
# 内部缓冲区名称扣分 if is_internal: score -= 0.5
# 在文件名开头或紧跟在tex_后的关键字加分(如 tex_diff.png) if filename_lower.startswith(keyword) or f'tex_{keyword}' in filename_lower: score += 1
# 简短文件名加分(真正的纹理通常有简短名称) if len(filename) < 30: score += 0.5
# 选择最高分 if score > best_score: best_score = score best_match = tex_type
return best_match
def find_best_texture(self, textures_folder: str, texture_type: str) -> Optional[str]: """ 在指定文件夹中找到最佳纹理文件(使用评分系统)
Args: textures_folder: 纹理文件夹路径 texture_type: 纹理类型 ('diffuse', 'normal')
Returns: 最佳纹理文件名,如果没找到返回None """ if not os.path.exists(textures_folder): return None
best_file = None best_score = -999
for file in os.listdir(textures_folder): file_lower = file.lower() extension = file_lower.split('.')[-1]
# 检查格式 if extension not in self.texture_formats: continue
# 分析类型 actual_type = self.analyze_texture_type(file) if actual_type != texture_type: continue
# 计算综合分数 score = 0
# 格式优先级加分 format_priority = self.texture_formats.index(extension) score -= format_priority * 10
# 内部缓冲区扣分 internal_patterns = [ r'\d+x\d+', r'_[rb]\d+g\d+b\d+', r'_tex\d*d', r'_sf\d+', r'_bf\d+', r'_camera', r'_attachment', r'_shadow', r'_normals', r'_depth', ]
import re if any(re.search(pattern, file_lower) for pattern in internal_patterns): score -= 100
# 友好的纹理名称加分 friendly_patterns = [ (r'tex_.*?_diff', 50), # tex_xxx_diff (r'tex_.*?_nm', 50), # tex_xxx_nm (r'.*_diffuse', 40), (r'.*_normal', 40), (r'.*_albedo', 40), (r'.*_col', 20), (r'.*_nrm', 20), ]
for pattern, bonus in friendly_patterns: if re.search(pattern, file_lower): score += bonus break
# 简短文件名加分 if len(file) < 30: score += 10
# 选择最高分 if score > best_score: best_score = score best_file = file
return best_file
def find_textures_in_model_folder(self, model_folder: str) -> Dict[str, str]: """ 在模型文件夹中查找所有纹理
Args: model_folder: 模型文件夹路径
Returns: 纹理映射字典 {'diffuse': 'path/to/diffuse.exr', 'normal': 'path/to/normal.png'} """ texture_map = {}
# 检查的纹理文件夹列表 texture_folders = [ os.path.join(model_folder, "textures"), # 优先PNG os.path.join(model_folder, "textures_exr") # 备选EXR ]
for texture_type in ['diffuse', 'normal']: for folder in texture_folders: texture_file = self.find_best_texture(folder, texture_type) if texture_file: texture_map[texture_type] = os.path.join(folder, texture_file) break # 找到就停止
return texture_map
class GLTFMaterialProcessor: """GLTF材质处理器 - 为GLTF文件添加材质和纹理"""
def __init__(self, embed_textures: bool = True, color_spaces: Dict[str, str] = None): """ 初始化GLTF材质处理器
Args: embed_textures: 是否内嵌纹理到GLB文件 color_spaces: 颜色空间映射 {'diffuse': 'srgb', 'normal': 'linear'} """ self.embed_textures = embed_textures self.color_spaces = color_spaces or {'diffuse': 'srgb', 'normal': 'linear'}
def create_pbr_material(self, material_name: str = "PBR_Material", diffuse_texture: str = None, normal_texture: str = None) -> Dict: """ 创建PBR材质
Args: material_name: 材质名称 diffuse_texture: 漫反射纹理路径 normal_texture: 法线纹理路径
Returns: GLTF材质字典 """ material = { "name": material_name, "pbrMetallicRoughness": {} }
# 添加漫反射纹理 if diffuse_texture: material["pbrMetallicRoughness"]["baseColorTexture"] = { "index": 0 # 将在后续填充正确的索引 }
# 添加法线纹理 if normal_texture: material["normalTexture"] = { "index": 1, # 将在后续填充正确的索引 "scale": 2.0 # 增加法线强度,部分渲染器需要更强的法线效果 }
# 设置默认值 if not diffuse_texture: material["pbrMetallicRoughness"]["baseColorFactor"] = [1.0, 1.0, 1.0, 1.0]
material["pbrMetallicRoughness"]["metallicFactor"] = 0.0 material["pbrMetallicRoughness"]["roughnessFactor"] = 1.0
return material
def load_texture_data(self, texture_path: str) -> bytes: """ 加载纹理数据
Args: texture_path: 纹理文件路径
Returns: 纹理二进制数据 """ try: with open(texture_path, 'rb') as f: return f.read() except Exception as e: raise Exception(f"Failed to load texture {texture_path}: {str(e)}")
def get_texture_mime_type(self, texture_path: str) -> str: """ 获取纹理MIME类型
Args: texture_path: 纹理文件路径
Returns: MIME类型字符串 """ # 根据文件扩展名确定MIME类型 ext = os.path.splitext(texture_path)[1].lower()
if ext == '.png': return 'image/png' elif ext == '.jpg' or ext == '.jpeg': return 'image/jpeg' elif ext == '.webp': return 'image/webp' elif ext == '.ktx2': return 'image/ktx2' else: # 对于EXR等其他格式,glTF规范不支持,但我们需要返回一个合理的默认值 # 实际上,如果纹理是EXR格式,我们应该在导出时转换为PNG mime_type, _ = mimetypes.guess_type(texture_path) return mime_type or 'image/png' # 默认返回PNG
def create_texture_info(self, texture_path: str) -> Dict: """ 创建纹理信息
Args: texture_path: 纹理文件路径
Returns: GLTF纹理信息字典 """ return { "uri": os.path.basename(texture_path), "mimeType": self.get_texture_mime_type(texture_path) }
def add_materials_to_gltf(self, gltf_path: str, model_folder: str, texture_matcher: TextureMatcher, log_callback=None) -> bool: """ 为GLTF文件添加材质和纹理
Args: gltf_path: GLTF文件路径 model_folder: 模型文件夹路径 texture_matcher: 纹理匹配器实例 log_callback: 日志回调函数
Returns: 是否成功 """ try: # 1. 读取现有GLTF文件 with open(gltf_path, 'r', encoding='utf-8') as f: gltf_data = json.load(f)
if log_callback: log_callback(f"正在处理GLTF文件: {os.path.basename(gltf_path)}")
# 2. 查找纹理文件 texture_map = texture_matcher.find_textures_in_model_folder(model_folder)
if not texture_map: if log_callback: log_callback(" 未找到任何纹理文件,跳过材质处理") return False
# 报告找到的纹理 for tex_type, tex_path in texture_map.items(): if log_callback: log_callback(f" 找到{tex_type}纹理: {os.path.basename(tex_path)}")
# 3. 从GLTF文件名生成材质名称 gltf_basename = os.path.basename(gltf_path) mesh_name = os.path.splitext(gltf_basename)[0] # 移除可能的 "fbx_" 前缀 if mesh_name.lower().startswith("fbx_"): mesh_name = mesh_name[4:] material_name = f"M_{mesh_name}"
# 4. 创建材质 diffuse_path = texture_map.get('diffuse') normal_path = texture_map.get('normal')
material = self.create_pbr_material(material_name, diffuse_path, normal_path)
# 4. 更新GLTF结构 self._update_gltf_with_materials(gltf_data, texture_map, material, model_folder, log_callback)
# 5. 保存更新后的GLTF文件 output_path = gltf_path.replace('.gltf', '_with_materials.gltf') with open(output_path, 'w', encoding='utf-8') as f: json.dump(gltf_data, f, indent=2)
if log_callback: log_callback(f" [成功] 材质已添加,保存到: {os.path.basename(output_path)}")
return True
except Exception as e: if log_callback: log_callback(f" [错误] {str(e)}") return False
def _update_gltf_with_materials(self, gltf_data: Dict, texture_map: Dict, material: Dict, model_folder: str, log_callback=None): """ 更新GLTF数据结构,添加材质和纹理
Args: gltf_data: GLTF数据字典 texture_map: 纹理映射字典 material: 材质字典 model_folder: 模型文件夹路径 log_callback: 日志回调函数 """ # 确保有必要的数组 if 'images' not in gltf_data: gltf_data['images'] = [] if 'textures' not in gltf_data: gltf_data['textures'] = [] if 'materials' not in gltf_data: gltf_data['materials'] = [] if 'samplers' not in gltf_data: gltf_data['samplers'] = [] if 'buffers' not in gltf_data: gltf_data['buffers'] = [] if 'bufferViews' not in gltf_data: gltf_data['bufferViews'] = []
# 创建采样器 diffuse_sampler_index = len(gltf_data['samplers']) gltf_data['samplers'].append({ "magFilter": 9729, # LINEAR "minFilter": 9987, # LINEAR_MIPMAP_LINEAR "wrapS": 10497, # REPEAT "wrapT": 10497 # REPEAT })
# 如果存在法线贴图,创建独立的采样器 if 'normal' in texture_map: normal_sampler_index = len(gltf_data['samplers']) gltf_data['samplers'].append({ "magFilter": 9729, # LINEAR "minFilter": 9987, # LINEAR_MIPMAP_LINEAR for better quality "wrapS": 10497, # REPEAT "wrapT": 10497 # REPEAT }) else: normal_sampler_index = diffuse_sampler_index
texture_indices = {}
# 收集纹理信息 all_texture_data = [] texture_info_list = [] texture_buffer_index = 0 # 初始化,稍后会更新
if self.embed_textures: # 内嵌模式:加载纹理数据并准备合并到buffer中 for tex_type, tex_path in texture_map.items(): try: texture_data = self.load_texture_data(tex_path) mime_type = self.get_texture_mime_type(tex_path)
# 检查纹理格式,如果不是glTF标准格式,记录警告但不停止 if mime_type not in ['image/png', 'image/jpeg', 'image/webp', 'image/ktx2']: if log_callback: log_callback(f" [警告] 非标准glTF纹理格式: {os.path.basename(tex_path)} ({mime_type})") # 但仍尝试使用它,因为Blender/其他工具可能支持
# 计算当前偏移(不包括填充) current_offset = sum(len(data) for data in all_texture_data)
# 计算需要的填充字节数(4字节对齐) padding_needed = (4 - (current_offset % 4)) % 4
# 记录纹理信息(包含填充后的偏移) texture_info_list.append({ 'type': tex_type, 'path': tex_path, 'data': texture_data, 'mime_type': mime_type, 'byte_offset': current_offset + padding_needed, 'byte_length': len(texture_data) })
# 添加填充字节(如果需要) if padding_needed > 0: all_texture_data.append(b'\x00' * padding_needed)
# 添加实际纹理数据 all_texture_data.append(texture_data)
except Exception as e: if log_callback: log_callback(f" [错误] 加载{tex_type}纹理失败: {str(e)}")
# 合并所有纹理数据并创建新的buffer if all_texture_data: combined_data = b''.join(all_texture_data)
# 创建用于纹理的新buffer(buffer索引1,因为buffer 0通常是几何数据) texture_buffer_index = len(gltf_data['buffers']) gltf_data['buffers'].append({ "byteLength": len(combined_data), "uri": f"data:application/gltf-buffer;base64,{base64.b64encode(combined_data).decode('ascii')}" }) else: # 外部引用模式:只记录纹理信息,不加载数据 for tex_type, tex_path in texture_map.items(): try: mime_type = self.get_texture_mime_type(tex_path) texture_info_list.append({ 'type': tex_type, 'path': tex_path, 'mime_type': mime_type, 'uri': os.path.basename(tex_path) }) except Exception as e: if log_callback: log_callback(f" [错误] 处理{tex_type}纹理失败: {str(e)}")
# 处理每个纹理(内嵌模式和外部引用模式都在这里处理) for tex_info in texture_info_list: try: # 获取纹理的原始文件名(不含扩展名)作为名称 texture_basename = os.path.splitext(os.path.basename(tex_info['path']))[0]
# 根据纹理类型生成更具描述性的名称 texture_name = f"{texture_basename}_{tex_info['type']}"
# 根据是内嵌还是外部引用创建不同的结构 if self.embed_textures: # 内嵌模式:使用bufferView buffer_view_index = len(gltf_data['bufferViews']) gltf_data['bufferViews'].append({ "buffer": texture_buffer_index, "byteOffset": tex_info['byte_offset'], "byteLength": tex_info['byte_length'] })
# 创建图像(添加name属性) image_index = len(gltf_data['images']) gltf_data['images'].append({ "name": texture_name, # 添加名称,便于Blender等工具识别 "bufferView": buffer_view_index, "mimeType": tex_info['mime_type'] })
if log_callback: log_callback(f" [内嵌]{tex_info['type']}纹理: {os.path.basename(tex_info['path'])} -> {texture_name}") else: # 外部引用模式:直接使用uri(同样添加name属性) image_index = len(gltf_data['images']) gltf_data['images'].append({ "name": texture_name, # 添加名称 "uri": tex_info['uri'] })
if log_callback: log_callback(f" [外部引用]{tex_info['type']}纹理: {os.path.basename(tex_info['path'])} -> {texture_name}")
# 创建纹理,使用对应的采样器索引 texture_index = len(gltf_data['textures'])
# 使用不同的采样器索引:diffuse用0,normal用1 sampler_to_use = diffuse_sampler_index if tex_info['type'] == 'diffuse' else normal_sampler_index
# 为纹理添加名称,方便在着色器编辑器中识别 texture_type_label = "Diffuse" if tex_info['type'] == 'diffuse' else "Normal" gltf_data['textures'].append({ "name": f"{texture_type_label}_Texture", "sampler": sampler_to_use, "source": image_index })
texture_indices[tex_info['type']] = texture_index
except Exception as e: if log_callback: log_callback(f" [错误] 处理{tex_info['type']}纹理失败: {str(e)}")
# 更新材质中的纹理索引 if 'diffuse' in texture_indices: material["pbrMetallicRoughness"]["baseColorTexture"]["index"] = texture_indices['diffuse']
if 'normal' in texture_indices: material["normalTexture"]["index"] = texture_indices['normal']
# 添加材质 material_index = len(gltf_data['materials']) gltf_data['materials'].append(material)
# 更新网格图元以使用材质 if 'meshes' in gltf_data: for mesh in gltf_data['meshes']: if 'primitives' in mesh: for primitive in mesh['primitives']: primitive['material'] = material_index
if log_callback: log_callback(f" [成功] 创建材质: {material['name']}")
def _embed_texture_to_buffer(self, gltf_data: Dict, texture_data: bytes, mime_type: str): """ 将纹理数据内嵌到GLTF buffer中
注意:此方法已弃用,内嵌逻辑已在 _update_gltf_with_materials 中处理
Args: gltf_data: GLTF数据字典 texture_data: 纹理二进制数据 mime_type: 纹理的MIME类型
Returns: Buffer索引 """ # 此方法已弃用,但为了向后兼容保留 return 0
def process_gltf_with_textures(gltf_path: str, model_folder: str, texture_keywords: Dict[str, List[str]], embed_textures: bool = True, texture_formats: List[str] = None, log_callback=None) -> bool: """ 处理GLTF文件,添加纹理材质的便捷函数
Args: gltf_path: GLTF文件路径 model_folder: 模型文件夹路径 texture_keywords: 纹理关键字映射 embed_textures: 是否内嵌纹理 texture_formats: 纹理格式优先级列表 log_callback: 日志回调函数
Returns: 是否成功 """ # 创建纹理匹配器 texture_formats = texture_formats or ['png'] texture_matcher = TextureMatcher(texture_keywords, texture_formats)
# 创建材质处理器 color_spaces = {'diffuse': 'srgb', 'normal': 'linear'} material_processor = GLTFMaterialProcessor(embed_textures, color_spaces)
# 处理GLTF文件 return material_processor.add_materials_to_gltf( gltf_path, model_folder, texture_matcher, log_callback )